
 8 Comments
 Few shooting technique subjects are as controversial as how to grip a handgun and control its recoil. There are a lot of different theories floating around out there. Some of them work better than others both for certain types of individuals and across the board generally.
Individual physiology can change what’s more or less effective. Stronger and larger people can often rely on brute strength and size. Even that isn’t enough, though, as they attempt to shoot faster and still try to make accurate hits.
Me, I’m a relatively petite woman who has been shooting seriously for quite some time. I have a pretty good idea of what works and has worked for me over the years. Because I’m small and have less upper body strength than most men, I have to rely on technique for recoil management. Some of my lessons learned will apply no matter how big or little you are.
But I’m still just one person, so I invited Paul Sharp to add a few of his insights. Paul is a martial arts instructor, owner of Straight Blast Gym Illinois, and a firearms instructor, as well as a member of the Shivworks Collective He’s at least as geeky as I am about some of the finer points of marksmanship technique. And he’s a strong, muscular dude who can deadlift about five of me.
Perhaps to nobody’s real surprise, what we discovered is that it’s complicated. There’s a lot that goes into hanging on to a gun efficiently.
Most people think about recoil management as starting from the hands, since they most directly interface with the gun. We think that the place to start is a bit further away – all the way at the ground. So in the first half of this two-part series, we’ll talk about stance. What you do with your feet is, ideally, the basis of everything you do with your gun. Obviously, we aren’t always shooting in a perfect world, but if you can’t make your technique work well then, it will only get worse as conditions deteriorate.
Starting Low: Feet and Legs

As new shooters, it’s common to hear about stance a lot, then less about it over time. There are even arguments that how you’re standing doesn’t really matter.
To some extent, that’s true. As long as you are in a reasonably athletic stance, you’re generally in pretty good shape to shoot. At the most basic level that means not having your feet right next to each other and not locking your knees – even bending them slightly. Just like any other sport, though, you can do better even if you’re only standing still to shoot and not planning on needing to move in any direction.
Start by having your feet about shoulder width apart. You’ll want one foot slightly in front of the other – left foot, if you’re shooting with your right hand dominant and right foot if you’re left-handed. Which eye you’re using doesn’t matter for these purposes. Keep those knees bent slightly.
And here’s the little detail that doesn’t often get talked about: exactly how you should distribute your weight on your feet. It’s tempting and easy for many people to have all of their weight sitting on their heels.
In fact…stand up right now and feel where the pressure is on the soles of your feet. If not on your heels, it’s probably evenly between your heels and under the balls of your feet. Now try shifting your weight so that more of it is on the balls of your feet. Not so far forward that your heels are off the ground, just a little bit.
Did you start feeling a little more active? Maybe more ready to move? Good!
Now think about what recoil does to your body. No matter how big or strong you are, recoil will still always push the shooter’s body backwards and away from the gun. Since that’s the case, starting out a little forward from the very bottom of your feet helps you fight and absorb that impulse.
If you have trouble remembering to do that, Paul’s advice is to “grab” the ground with your toes. That tends to move your knees slightly ahead of your toes, and helps keep your weight forward.
To the Middle: Hips and Core
You can sit down now because we’re going to travel up to your hips and core.
This is where some shooters will say you should lean forward or even push your rear end back to get your upper body ahead of your feet. Certainly bending at the hips is better than at the waist, but is it really necessary and if so, how far?
Much like we saw in the feet and legs, some forward bias is a good thing. Too much is not. Just like standing on your toes will ultimately make you less stable, a super exaggerated bend to get your torso forward won’t be of much help either. Some people will find a need to get forward a bit more than others, especially if they are smaller and lighter, but speed racer mode isn’t generally necessary.
Think about how you walk around every day or even how you run. How far do you lean forward then? Probably not much, if at all, even if you’re heading straight into the wind. Shooting is much the same even with the added element of recoil management. Bend at the hips just a tad and think more about the two following things instead.
When possible, facing your target squarely with your hips and torso is ideal. If you are familiar with the vocabulary of traditional shooting stances like the Weaver and Chapman, you might already know that they “blade” the body to the target. But for modern technique largely encompassed by the Isosceles stance, and strictly speaking about shooting and not other considerations that might come into play when you’re using a gun, we like directly facing the target. The reasons why will become more clear as we continue to move up the body.
In the meantime, there are a lot of big muscles in your torso that can also help you manage recoil – your core muscles. You’ve likely heard quite a bit about strengthening your core for general physical fitness, including improving your posture and stability. A strong core enables you to move your entire body without pain and injury. By tensing your core while shooting, you’ll also help your body manage the recoil impulse of the gun.
Not sure how to do that? Paul describes flexing the core “almost like doing a standing crunch pulling my ribs downward towards my hips. It’s not necessary to contract your core to the point of fatigue…think of the Hollow Hold position as taught in gymnastics.”
Tightening your core will steady your body from being pushed around as much by holding your upper body, from hips up, in the position that you want it to stay in. It also creates a more solid unit to resist the push of recoil so that to the extent you’re being pushed backwards by the gun, you don’t bend backwards at the waist. Among other things, that means your legs get to stay engaged in the business of managing recoil.
For women especially, much of our body weight and power is going to be concentrated in the lower body. While it’s possible to build significant upper body strength, there’s no reason to ignore and not take advantage of how the legs and core can help. As a pistol recoils in the hands, that force comes up through the arms and shoulders, and then it keeps going. If you have all of that extra mass available in your body, you should use it! But now that we’ve worked our way up through the core, it’s time to get into what it takes to hang onto the gun itself.
The Tactical Turtle….or Not?
The position of one’s shoulders is the topic of endless debate in certain segments of the shooting community.
At one end are the folks who hunch the shoulders forward, sometimes so far that the tops of the shoulders are nearly aligned with the arms pointing forward and the cheeks or ears between the biceps. You might have heard it referred to as the “tactical turtle.”

Speaking strictly from a body mechanics point of view, it’s not ideal. Turtling creates a lot of muscular tension and stress on the joints, especially as you raise your head enough to see the sights. When demonstrating it to my rehabilitative massage therapist, he pointed out a number of ways in which consistently forcing that position can cause permanent shoulder and neck damage.
He likes the alternate technique called the “scapular squeeze” or the “scapular retraction,” which is also what I and Paul prefer from a performance perspective. I originally learned it from Harold Hawkins, and it goes something like this:
- Bring your shoulders back, just like when your mom told you to stand up straight, squeezing as if you’re trying to get the points of your shoulder blades to touch behind you. You might also think about pushing your sternum forward, which is a trick Paul uses.
- Drop your shoulders down towards the ground. You want to counteract any tendency you have to shrug them up towards your ears.
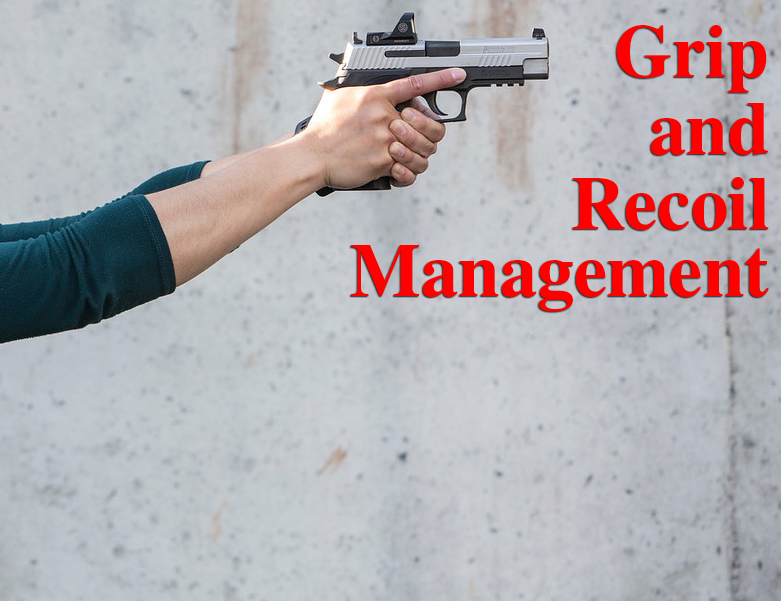
- Squeeze your armpits closed. If your arms are out in front of you as if you’re shooting a pistol, you might even rotate your elbows so that their creases start pointing up towards the sky. As you do so, you’ll notice that this will bring the edges of your palm closest to the ground together.
You’ll notice that when you try this while (even pretending) to hold a gun, you probably won’t be able to get your arms out completely straight in front of you. That’s okay – the slight bend in your elbows will act as little shock absorbers of your gun’s recoil. You actually want it there.
Looking Up – Head & Neck

Now before we move on further down the arms, let’s talk a bit about what your head and neck are doing as you shoot.
The other advantage of the scapular squeeze is that you can keep your neck in a more natural and relaxed position. There’s no need to push your head forward and down in order to see through your sights. Instead, the gun is just about in front of your eyes. Taking this strain off your neck is both more comfortable and easier to maintain through a long day of shooting.
It can still be tempting to drive your eyes physically toward the sights and target. That will result in you losing that advantage of not stressing your neck. Paul’s coaching point is one of the most useful I’ve found to remember to keep my head upright: point your chin at the target. You might need to move your gun up a little in order to use your eyes, but that’s a good thing.
Keeping your face as forward as possible to the target allows you to use your eyes as completely as possible. They’ll be able to see more, which is helpful from both a technical shooting and a self-defense or tactical perspective. And they’ll be less fatigued as you do so, which means you’ll see better and faster since you’ve lessened the workload on your eyes.
Not sure? Try this: without moving your screen, tuck your chin into your chest and try to read these words. Notice not just your neck working to keep your head down, but your eyes rolling up so that can maintain your view. Now, keeping your screen in the same place, point your chin at it so that your face is parallel to the screen. Doesn’t that feel better? The effect is even more pronounced if you try it with a screen or poster on the wall.
Finally, the Hands!
After this journey up through the body, we’re finally at the main event, what you thought grip was all about – the hands that actually, well, grip the gun.
The first issue with the hands is how they should hold onto the gun. We’ll start with a little vocabulary here. While most all of us know where a gun’s grip is, there are several different parts to and near it that can create some landmarks for getting your hands in the best possible position. I’m focusing on semiautomatic pistols here, since they’re the most common.

At the bottom of your grip is the magazine well, where you insert magazines into the gun. If you have little hands like mine, it’s rarely something you need to think about as part of your grip. If you have larger hands, however, or you’re shooting a very small gun, the magazine well becomes more important because you need to keep the meat of your hand out of its way. One of the ways you do that is by keeping your dominant, shooting hand high up on the tang of the grip.
You might have heard the tang also referred to as a beavertail – it’s that part at the top back of the grip right under the slide.

Getting the web of your hand between your thumb and index finger against the tang or beavertail is a good indicator that you are high enough up on the grip. If you have big or meaty hands, just be careful about where the slide will move back and forth as it cycles.
The other important touchpoint is the bottom of the trigger guard. Jamming the middle finger of your shooting hand right up to it helps keep your hand high on the grip. If you have skinny hands, the feeling of the side of your finger against the trigger guard can be helpful tactile marker for knowing that your dominant hand is in the right place.
As for your non-dominant hand, there are a few schools of thought about exactly where it should be placed around the grip. One constant, though, is that it also should be as high up as possible. The trigger guard provides a handy guide for that too. You want at least your index finger up hard against it. Some folks like to get their middle finger against the trigger guard as well. There are some arguments for wrapping the index finger or more around the front of the trigger guard, but that’s generally not a preferred technique and can cause more problems than it helps.
Paul has a different way of describing placement of the non-dominant hand. Rather than focus on where the top fingers are, he recommends stacking the pinky fingers on top of each other. The rest of the fingers will then fit into the available space, keeping you high up on the gun.
With revolvers, the most important thing to keep in mind is that you don’t want to burn your thumbs with the hot gasses escaping from the cylinder. Instead of pointing your thumbs forward, you might instead want to cross them over each other and point the tips toward the ground. You also won’t have a beavertail. Otherwise, considerations about grip won’t be much different for you with a wheelgun.
How your hands are placed on the gun is an important part of the recoil management equation because they dictate where you’ll apply the strength that you have. As Paul puts it, leverage is more important than pure strength. You need to be strong, but using that strength correctly is the key.
The Power of Strength

When we ask how hard we need to grip the gun, what we’re really asking is how strong to we need to be. The answer is as strong as you can be, through all of the muscles we’ve talked about through the body.
While you don’t need a lot of strength to shoot pistols – in fact, guns are called the equalizer in physical fights for many good reasons including the fact that they don’t require great physical ability – more strength does mean better recoil management. And better recoil management means being able to shoot faster, more accurately.
That doesn’t mean that it’s not possible to do a lot of recoil management purely through the use of excellent technique. There’s a reason young and petite shooters can shoot quickly and accurately, and not get pushed around by their guns. While they may not be as strong as another shooter, they’re using a greater proportion of their available strength by applying better technical skills.
The benefit of better leverage via a better technical grip with your hands on the gun and with the engagement of the rest of your body is that you will be able to use more, bigger muscles to hang on to your gun. While it is possible to brute force your way into taming recoil, it’s even better to apply that strength to strong technique. That’s why having good technique from the ground up and being as strong as you can be are the winning combination.
In the end, what this means is that you grip the gun as hard as you can.
Or, as I learned from Ben Stoeger, the answer to the question of how hard you grip the gun is: harder. For most people, when the issue is recoil management, it’s nearly impossible to grip too hard. And, in fact, when shooting at speed, gripping hard is one of the elements that can help absorb mistakes in trigger management that would otherwise drive hits off target.
You’ve likely seen quite a bit of discussion about which hand should grip harder. I’ve heard 60%/40% in favor of the non-dominant hand, sometimes 70%/30%. My recommendation is to not think about it in that level of detail. Grip the gun hard.
What you want to watch out for is putting so much tension in shooting hand that you are not able to move your trigger finger freely. That’s the one exception to gripping harder. If you need to back off on your dominant hand grip enough to press the trigger quickly and accurately, that’s what you should do because good trigger manipulation is more important.
By doing so, your support hand will naturally be gripping the gun harder than your shooting hand. However much harder that is, is correct for you.
But you can always grip harder overall, so the question then is how to build that strength. General physical fitness helps, but it’s not the only way. The exercise that Paul uses is another approach:
“I like to use isometric exercises where I hold the pistol extended in a firing position, as tightly as possible, locking down, and stabilizing all the necessary muscle groups as intensely as possible. I can usually manage to do this for one minute, then I rest for two minutes. Repeat this for three to five repetitions. Of course we don’t want to shoot with this degree of physical tension but what we’re attempting to build is strength, and endurance specific to the task. After a few weeks of these exercises stabilizing the pistol solidly will be normal or what I like to call our new normal. This goes a long way toward allowing us grip tightly, and stabilize the pistol with greater tension than previously without fatigue or affecting trigger control.”
You’ll note that Paul distinguishes between how hard you grip during this exercise and how hard you go when you’re actually shooting. What I’ve found in practice is that this is primarily applicable to your shooting hand, and to the rest of your body if you’re moving while you shoot. It’s still a good idea to continue to clamp down on all of those muscles as much as you can while actually shooting, except as far as you need to loosen your shooting hand to manipulate the trigger.
By the way, one minute is a long time if you’re doing the exercise right and you might need to work up to it. However, doing it a few times a week will both make you stronger and help you really learn the proper way to position your entire body for optimum recoil management.
And that work is worth it even with mildly recoiling pistols because one of the other advantages of a strong grip is that you will soon be literally holding your gun in a vise. It’s not so much that that will reduce movement of the gun itself as you aim on target, but it will soak up imperfections in your trigger press.
I’ve mentioned it before, but it’s worth repeating now that you really understand what gripping hard looks like. As an experiment, you can in dry fire – even with a blue gun – grip lightly and yank the trigger. Then try gripping the gun hard and yanking the trigger the same amount. Bet your sights moved less the second time. It won’t fix all problems with your trigger press, but it will help.
Managing Recoil – Putting It All Together

We started with the idea that having a good grip is an essential part of having good recoil management. That’s true, but we’ve also explored all of the other factors that go into keeping a pistol pointed at a target as much as possible. These are elements that I use as a small woman, that Paul uses as a large man, and that we’ve both found work for shooters across the spectrum of ability, size, and strength.
Many of the points here are really best suited to standing and shooting. You shouldn’t throw them out the window once movement becomes involved, though. You can still keep your posture similar, or even more aggressive, tighten your core, do that scapular squeeze, and grip the gun hard and with good technique. Starting with the best possible technique and use of strength in ideal conditions will mean you are that much better off as conditions start to degrade.
So get out there, try the exercises we’ve suggested, and see and experience how much less your gun bounces around while you shoot. Drive the gun; don’t let it drive you.


I like the scapular squeeze concept, even though I am somewhat more of the turtle. As a weight lifting coach I teach the scapular squeeze for the Bench Press, Dead Lift, Cleans, Snatches and all overhead movements so it makes sense..
Annette,
I enjoyed your article, From the Ground Up: Grip and Recoil Management, right up to the point where you start talking about actually gripping the pistol. In each other area, i.e., stance, hips, shoulders, arms, head and neck, you used sound physiological and mechanical principles. When you got to the grip you threw those principles out and went to brute strength, or at least as much strength as one can muster.
The recoil mechanics of a semi-automatic pistol are well known. The major recoil vector is directly to the rear with a slight rotational force due to bullet rotation. When the web of the hand is placed high on the beavertail (with nothing else touching the grip) it creates a fulcrum, a point at which the rearward vector forces now rotate around. This rotational force at the fulcrum causes the muzzle to rise. One of the main purposes of a good grip is to counter this rotational force.
With the heal of the hand high on the backstrap and the second phalanges of the hand lined up on the front of the grip with the finger tips relaxed, the hand is putting pressure on the front and back of the grip like a vise. Most of the pressure on the front of the grip is concentrated in the fingers on the lower part of the grip. In fact, this is called the “vise grip.” The support hand takes the position as you described and reinforces the pressure on the lower part of the front grip. Some recommend an exaggerated forward rotation of the wrist (dorsal deviation) but I find this uncomfortable and it also causes some abnormal shoulder rotation, so I don’t use it. Isometric tension can be established between a pull from the support hand and a pushing motion from the dominant hand.
Why not curl the finger tips in and put pressure on the grip with them as well? This is called the “rope” or “monkey grip.” We don’t want to do this for two reasons. First, mechanically, finger tip pressure will add nothing to lessening recoil. And, unless you are very strong, the palms of the hands do a very poor job of mitigating shear forces on the sides of the grip during recoil. Try holding the sides of the grip between your fingers and rotate the gun up in a clockwise fashion. Probably, with typical texturing, you cannot keep the gun from rotating. The second reason is physiological. When doing gross hand/tool skills, the hand works best as a unit. When the finger tips of the hand are curled into the palm with pressure, the index finger (trigger finger), at least for the majority of the population, does not function well independently. This has to do with the flexor tendons of the fingers having a common origin. Give it a try.
But, if you only put pressure on the middle phalanges of the 2nd – 4th fingers with relaxed finger tips, the index (trigger) finger moves freely, is not inhibited by the vise grip pressure and is less likely to cause movement of the other fingers when flexing to execute a trigger press. In fact, the dominant hand can be a bit more relaxed, which allows for free movement of the trigger finger between the trigger and the safe position on the frame when needed.
Building grip and hand strength is always a good thing, but gripping harder is not the answer. Gripping in a mechanically and physiologically sound way will provide for better recoil management. Check out this video for an interesting demonstration of why the vice grip works: https://dryfiretrainingcards.com/…/manage-45-recoil-2…/ .
Keep up the good work,
Alan Kerby
Is it me that finds the time on her watch ironic?
I am far sighted and wear progressives. The face forward position would be a great advantage to me as when I have my head down my eyes are looking through the top of my glasses which makes sharp sight focus impossible. I want to be able to easily transition from target focus to sight focus (see Brian Enos type 3 shooting). So am glad you have suggested the stance in this article.
Squeezing the armpits with a slight Bend at the elbows that is natural helps handle a lot of recoil,and it doesn’t shake that much when you get it just right ,,you are going to have to shoot slow double taps for a while, and shoot a lot of them until you get it natural muscle memory, it’s not going to be cheap or inexpensive to get natural and good at this, if you try to save money forget it
I didnt know you should not have your grip on the bottom recoil part of the pistol ,yet that gives me a more accurate grouping should I learn not to hold the recoil part of the pistol? on a pellet gun 800 express
What part of the pistol are you calling the “recoil part”?
Great article.